Amit Kumar | Ninja
Table of Contents
- 1 Step 2: Connect to Your EC2 Instance via AWS Console (No SSH Needed)
In my previous tutorial, we built a smart AI agent in “Build Your First Real-Time AI Agent—Low Code, Just Logic with n8n” using Google Gemini and SerpAPI inside n8n’s visual builder. It worked well on the hosted version, but for heavier or long-running workflows, I needed more control — that’s where self-hosting on AWS EC2 with Docker comes in. In this guide, I’ll show you how to set it up for free.
 This pulls the latest package info and ensures your server is ready for Docker.

1. Run this to check your Docker version and confirm everything is working:
2. You should see something like:
🎉 Docker is now installed and ready!

Note:
Why Self-Host n8n?
When I first started experimenting with AI workflows and automation, I quickly hit limits on hosted platforms — execution quotas, slow performance, or lack of customization. That’s when I realized: self-hosting n8n gives you complete freedom. By running n8n on your own infrastructure:- You get full control over your data and credentials
- No per-execution costs — run long workflows or scheduled jobs freely
- Integrate deeply with internal tools, databases, APIs
- Customize the environment (plugins, LLMs, scripts, secrets)
- Deploy to any cloud or local machine
Why AWS Free Tier + Docker is the Perfect Setup
As a full-stack developer working with DevOps and automation, I’ve always leaned on AWS EC2 + Docker for personal projects and prototyping. Here’s why this combo works beautifully for self-hosting n8n:- EC2 Free Tier: Use t2.micro to run n8n 24x7 without paying a rupee — ideal for personal use or MVPs.
- Docker Makes It Dead Simple : One command, and your n8n instance is up — with persistent storage, environment configs, and restart policies built-in.
- Secure & Controlled Environment : You control everything: SSH access, open ports, and authentication. No vendor lock-in or data sharing.
- Dev workflow optimized: You can back up your workflows, manage them with Git, and run n8n alongside Node.js apps, APIs, or Telegram bots — all from the same server.
What You'll Get from This Tutorial
By the time you complete this hands-on setup, you’ll be running:- A fully working n8n instance
- Hosted on a Free Tier AWS EC2 server
- Running inside Docker (single-container setup, no Docker Compose)
- Secured with basic authentication
- With persistent storage so your workflows, credentials, and history are saved
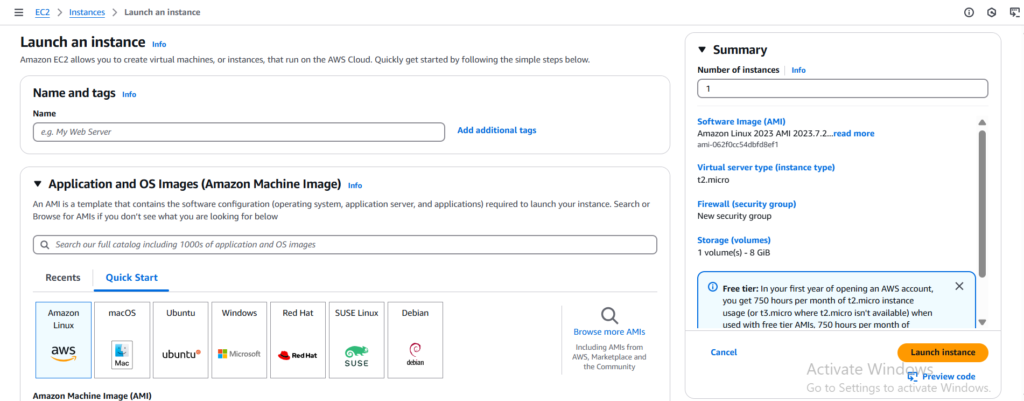
Step 1: Launch a Free EC2 Instance on AWS
We’ll start by spinning up a t2.micro Ubuntu server on AWS EC2. This instance is part of the AWS Free Tier, so you won’t be charged — just make sure your account is eligible (new accounts get 12 months of free EC2 time).🔹 1.1 Log into the AWS Console
- Go to https://console.aws.amazon.com/ec2
- Sign in with your AWS account.
🔹 1.2 Configure the Instance
Once you click “Launch Instance”, fill in the following details:- Name: Set the instance name to n8n-server so it's easy to identify later.
- AMI (Amazon Machine Image): Choose Ubuntu Server 22.04 LTS. It’s stable, lightweight, and supported by Docker.
- Instance Type: Select t2.micro — this is eligible for the AWS Free Tier and works perfectly for a self-hosted n8n setup.
- Key Pair: If you already have a key pair, select it. Otherwise, create a new one. (Note: You won’t need to download or use this if you're connecting via the browser — EC2 Instance Connect.)
- Network Settings: Create a new security group and configure it in the next step to allow SSH, HTTP, and port 5678.
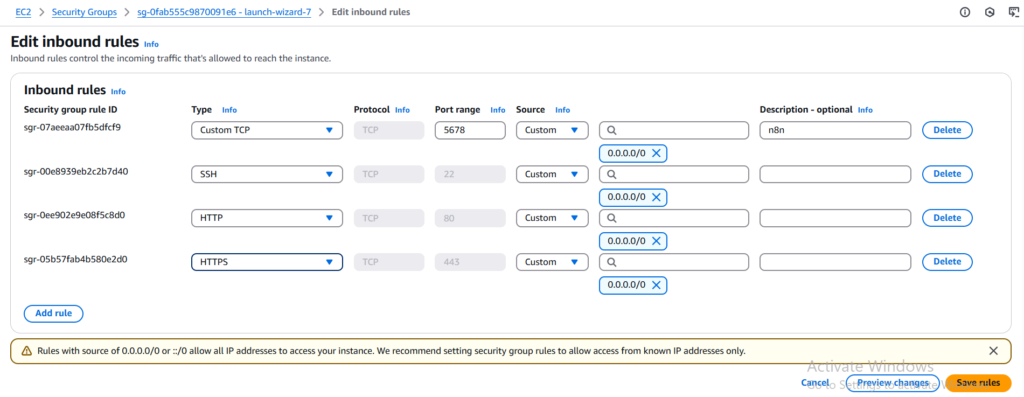
🔹 1.3 Set Up Security Group Rules
Make sure to allow:- SSH (Port 22) – From your IP (or anywhere if testing)
- HTTP (Port 80) – Optional, if planning to add HTTPS later
- Custom TCP (Port 5678) – This is the port n8n uses.
🔹 1.4 Launch the Instance
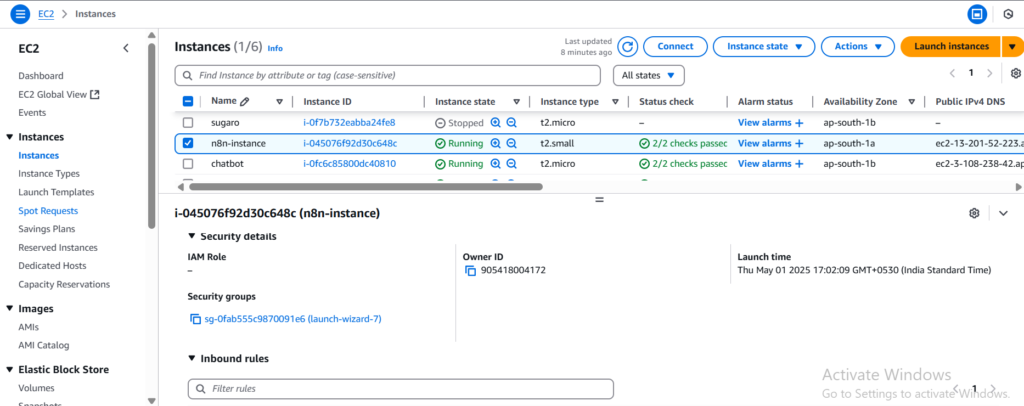
Click Launch Instance, and AWS will start your EC2 server in under a minute.- Go to the Instances tab.
- Wait until the status is running
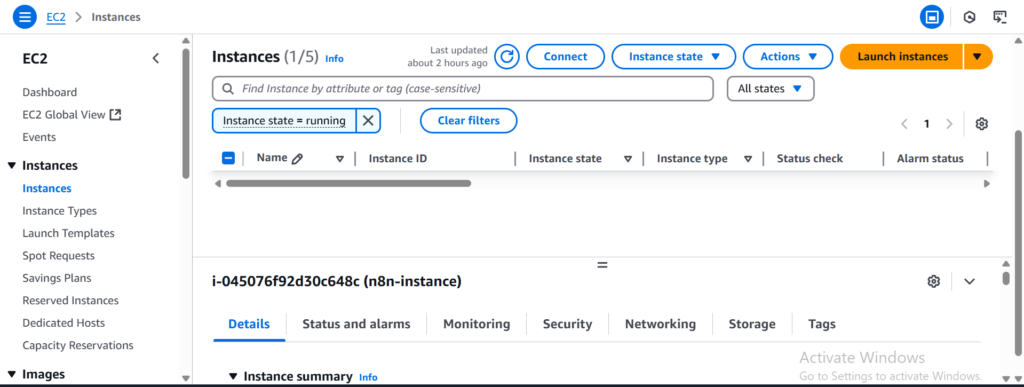
Step 2: Connect to Your EC2 Instance via AWS Console (No SSH Needed)
Now that your EC2 instance is up and running, it’s time to log in and set things up. Normally, you'd use SSH with a .pem key — but AWS makes it easier. We’ll use EC2 Instance Connect, which gives you terminal access to your server directly from the browser — no terminal setup required.🔹 2.1 Open EC2 in the AWS Console
- Visit the EC2 Dashboard.
- Click Instances in the sidebar.
- Find your instance (e.g. n8n-server).
- Select the checkbox next to it.
🔹 2.2 Connect Using EC2 Instance Connect
- Click the “Connect” button at the top.
- In the “Connect to instance” screen, choose:
- Connection method: EC2 Instance Connect (browser-based).
- Click “Connect”.
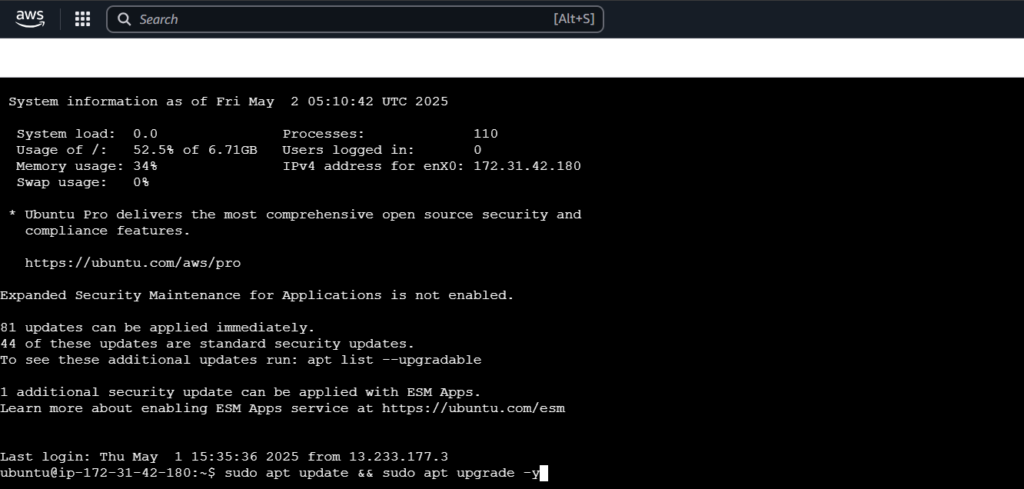
Step 3: Install Docker on Your EC2 Server
Now that you’re inside the EC2 terminal using the browser-based shell, let’s install Docker — the tool we’ll use to run n8n as a container. Why Docker? Docker gives me repeatable, isolated environments that just work — no dependency hell, no “it worked on my machine” problems. Whether I’m deploying an API, a bot, or n8n — Docker’s always part of my DevOps toolbox.🔹 3.1 Update Package Repositories
Let’s make sure your system is up to date. Run this command on the machine terminal. This pulls the latest package info and ensures your server is ready for Docker.
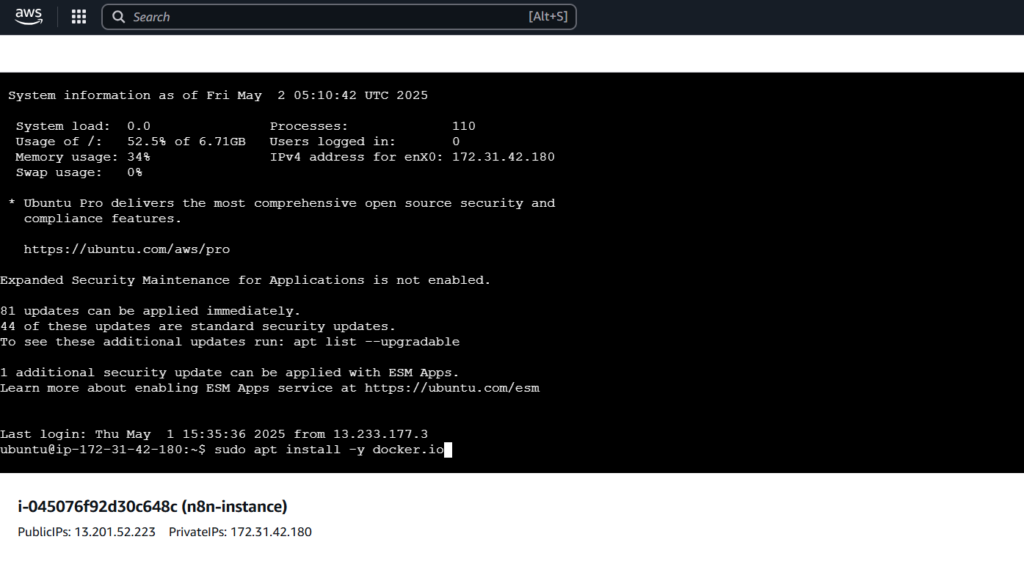
🔹 3.2 Install Docker
Now install Docker itself. Run this command on the machine terminal.
🔹 3.3 Verify the Docker Installation
1. Run this to check your Docker version and confirm everything is working:

2. You should see something like:

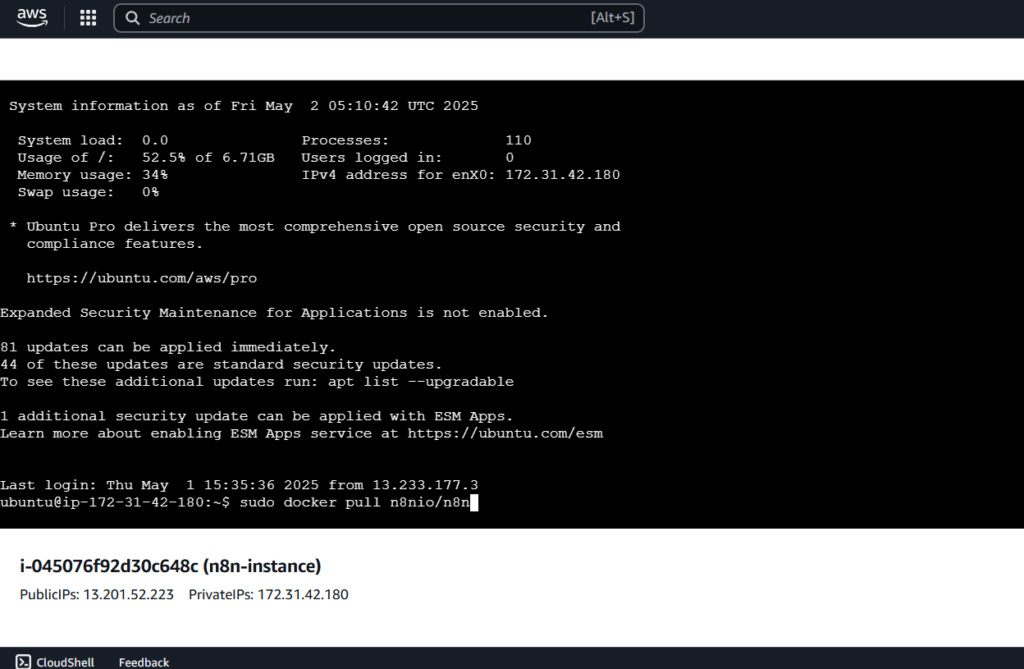
Step 4: Run n8n with Docker (One-Line Command)
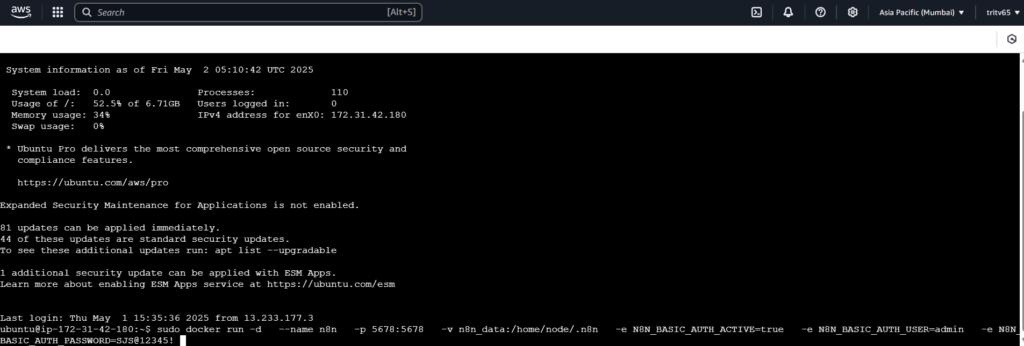
With Docker installed, it’s time to deploy n8n using a single command. This will launch n8n with persistent storage, authentication, and a few essential settings to make it production-ready — even on a free EC2 box. 🛠️ Why I Love This Setup (Amit's Note): When I’m testing or building automation agents, I don’t want YAML, Compose files, or server configs — just one Docker command and I’m live. This is how I bootstrap nearly every n8n workflow I prototype.🔹 4.1 Pull the Official n8n Image
1. Just to make sure you’re working with the latest version:
🔹 4.2 Run n8n in a Container
1. Now run this one-liner to launch your n8n instance: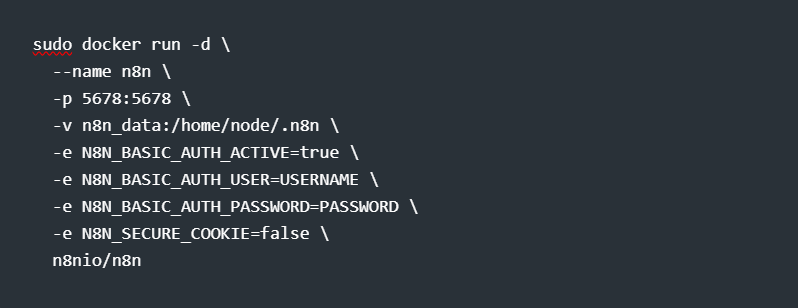
Replace a****a and S****S with your actual username and password. Use strong credentials for production.
🔍 What Each Part Means:
🔹 Docker Run Command Options – Explained Simply- -d: Runs the container in the background (detached mode).
- --name n8n : Name your container n8n so you can refer to it easily later.
- -p 5678:5678 : Maps port 5678 from your EC2 instance to the container — this is the port n8n uses for its web UI.
- -v n8n_data:/home/node/.n8n : Mounts a Docker volume to store workflows and credentials persistently (so they don’t disappear after a reboot).
- -e N8N_BASIC_AUTH_* : Enables login authentication for your n8n UI. You’ll set a username and password using these flags.
- -e N8N_SECURE_COOKIE=false : Allows you to access n8n over regular HTTP (important if you haven't set up HTTPS yet).
- -e TZ=Asia/Kolkata : Sets the server's timezone to your local region for logs and scheduled workflows.
- --restart unless-stopped : Ensures that n8n automatically restarts if the server is rebooted or Docker crashes.
- n8nio/n8n : The official Docker image for n8n from Docker Hub.
🔹 4.3 Check That It’s Running
1. To confirm the container is live. Run this command on the machine terminal.
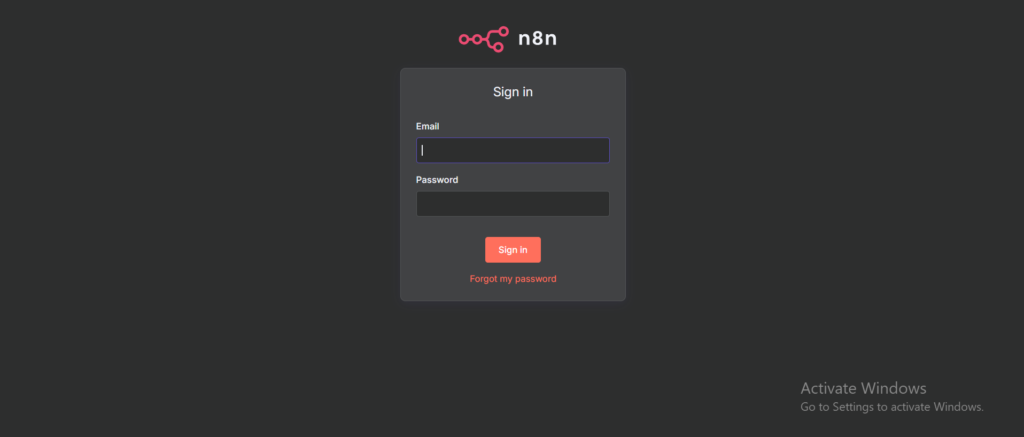
4.4 Access the n8n Dashboard
1. In your browser, go to:http://<your-ec2-public-ip>:5678